“Hope for the best. ”
MVVM
MVVM构成
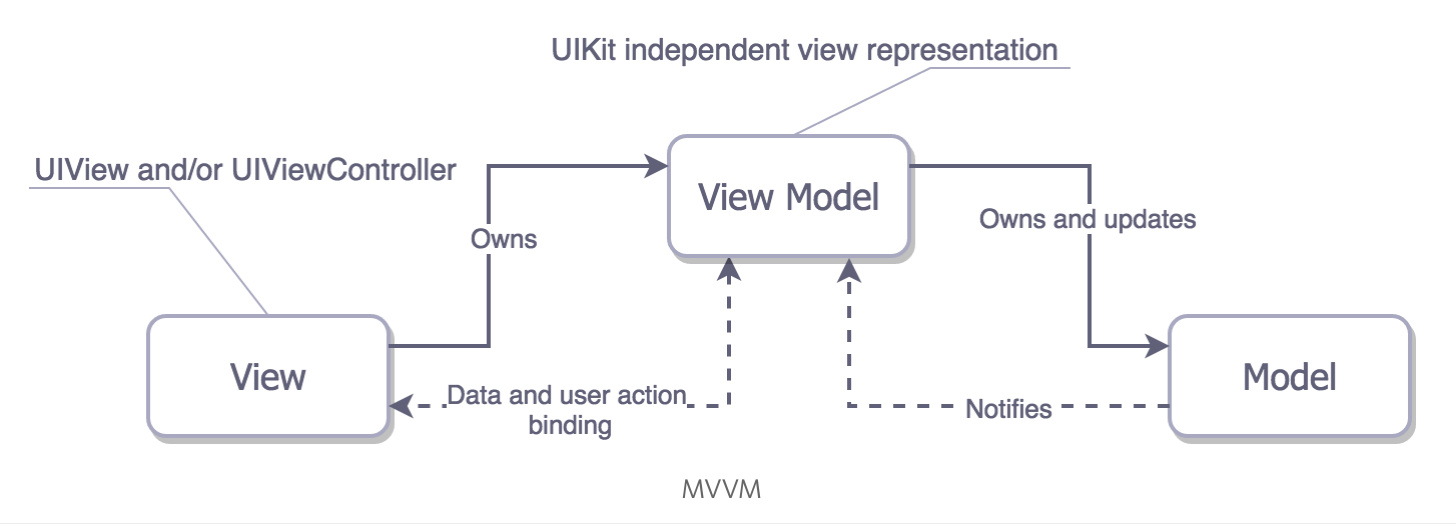
MVVM 看上去和 MVP 很像:

显然,MVVM 也将 ViewController 视为 View。之前我们说了 MVC 中的 Controller 里有大量表示逻辑,ViewModel 就是承载这些表示逻辑的东西。
MVVM 的 ViewModel 和 MVP的 Presenter 相比,多了数据绑定机制。一旦 ViewModel 所对应的 Model 发生变化,ViewModel 的属性也会发生变化,而相对应的 View 也随即产生变化。绑定机制既有很明显的强大优点——自动连接 View 和 Model,也有很明显的缺点——更高的耦合度,更复杂的代码逻辑。
MVVM数据绑定机制
实现绑定一般有两种方式:
- 基于KVO的绑定:比如 RZDataBinding 和 SwiftBond
- 函数响应式编程:比如像 ReactiveCocoa、RxSwift 或者 PromiseKit
实例
RxSwift框架 和 KVO过度复杂,我们使用 showGreeting 方法 和 greetingDidChange 回调方法来达成这个目的。
 import UIKit

struct Person { // Model
    let firstName: String
    let lastName: String
}

protocol GreetingViewModelProtocol: class {
    var greeting: String? { get }
    var greetingDidChange: ((GreetingViewModelProtocol) -> ())? { get set } // function to call when greeting did change
    init(person: Person)
    func showGreeting()
}

class GreetingViewModel : GreetingViewModelProtocol {
    let person: Person
    var greeting: String? {
        didSet {
            self.greetingDidChange?(self)
        }
    }
    var greetingDidChange: ((GreetingViewModelProtocol) -> ())?
    required init(person: Person) {
        self.person = person
    }
    func showGreeting() {
        self.greeting = "Hello" + " " + self.person.firstName + " " + self.person.lastName
    }
}

class GreetingViewController : UIViewController {
    var viewModel: GreetingViewModelProtocol! {
        didSet {
            self.viewModel.greetingDidChange = { [unowned self] viewModel in
                self.greetingLabel.text = viewModel.greeting
            }
        }
    }
    let showGreetingButton = UIButton()
    let greetingLabel = UILabel()

    override func viewDidLoad() {
        super.viewDidLoad()
        self.showGreetingButton.addTarget(self.viewModel, action: "showGreeting", forControlEvents: .TouchUpInside)
    }
    // 布局代码
}
// MVVM
let model = Person(firstName: "David", lastName: "Blaine")
let viewModel = GreetingViewModel(person: model)
let view = GreetingViewController()
view.viewModel = viewModel
抛开绑定机制不说,ViewModel 做的就是表示逻辑的载体,最简单的实现就是在 ViewController 中调用:
self.greetingLabel.text = self.viewModel.greeting
MVVM经典demo请点击mvvmc-demo
MVVM特点分析
- 1、职能均分:分隔的很清楚。事实上,MVVM的View要比MVP中的View承担的责任多。因为前者通过ViewModel的设置绑定来更新状态,而后者只监听Presenter的事件但并不会对自己有什么更新。
- 2、容易测试:确实易于测试。如果我们没有将表示逻辑移入 ViewModel,我们将不得不实例化一个完整的 ViewController 以及伴随的 View,然后去比较我们 View 中的数值。但另一方面,数据绑定机制使得 定位 bug 变得更难了。数据绑定使程序异常能快速的传递到其他位置,在 View 上发现的 bug 有可能是由 ViewModel 造成的,也有可能是由 Model 造成的,传递链越长,对 Bug 的定位就越困难。
- 3、易用,维护成本低:在我们例子中的代码量和 MVP 的差不多,但是在实际开发中,使用了诸如 ReativeCocoa 这样的第三方库 ,MVVM 代码量将会小的多。
VIPER+Protocol

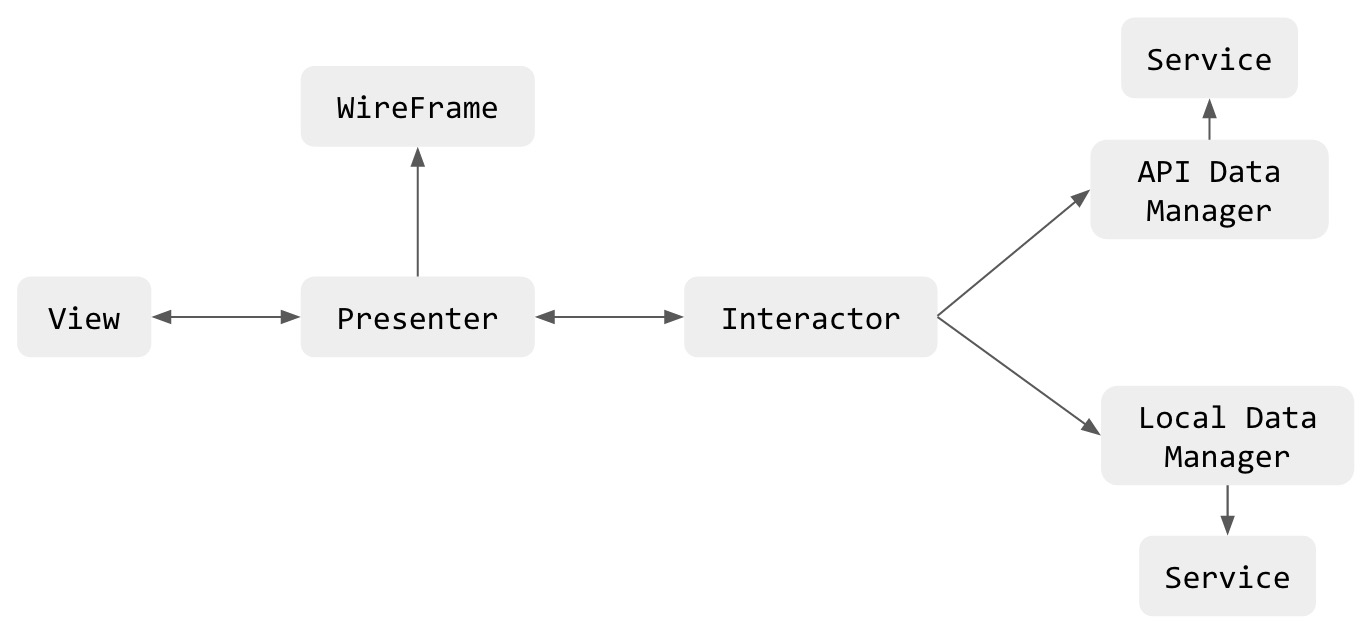
viper架构模式是目前我们公司移动部门在使用的一个架构模式,相比之前的(MVX)系列架构模式,它拥有更细粒度的职责划分。
VIPER+Protocol分层
先贴一张VIPER的简单实例图

View
- 提供完整的视图,负责视图的组合、布局、更新
- 向Presenter提供更新视图的接口
- 将View相关的事件发送给Presenter
Presenter
- 接收并处理来自View的事件
- 向Interactor请求调用业务逻辑、网络请求
- 向Interactor提供View中的数据
- 接收并处理来自Interactor的数据回调事件
- 通知View进行更新操作
- 通过Router跳转到其他View
Interactor
- 维护主要的业务逻辑功能,向Presenter提供现有的业务用例
- 维护、获取、更新Entity
- 当有业务相关的事件发生时,处理事件,并通知Presenter
包含数据(Entities)或者网络相关的业务逻辑。比如创建新的 entities 或者从服务器上获取数据;要实现这些功能,你可能会用到一些服务和管理(Services and Managers):这些可能会被误以为成是外部依赖东西,但是它们就是 VIPER 的 Interactor 模块。
Router
- 提供View之间的跳转功能,减少了模块间的耦合
- 初始化VIPER的各个模块
Entity
- 和Model一样的数据模型,Entities 只是一个什么都不用做的数据结构体。
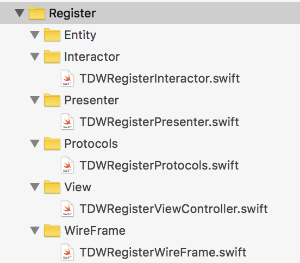
Protocol
//Protocol that defines the view input methods.
protocol TDWRegisterViewInterface: class {

}
//Protocol that defines the commands sent from the View to the Presenter.
protocol TDWRegisterModuleInterface: class {

}
//Protocol that defines the commands sent from the Interactor to the Presenter.
protocol TDWRegisterInteractorOutput: class {

}
//Protocol that defines the Interactor's use case.
protocol TDWRegisterInteratorInput: class {

}
//Protocol that defines the possible routes.
protocol TDWRegisterWireFrameInput: class {

}
VIPER的优缺点
优点
VIPER的特色就是职责明确,粒度细,隔离关系明确,这样能带来很多优点:
- 可测试性好。UI测试和业务逻辑测试可以各自单独进行。
- 易于迭代。各部分遵循单一职责,可以很明确地知道新的代码应该放在哪里。
- 隔离程度高,耦合程度低。一个模块的代码不容易影响到另一个模块。
- 易于团队合作。各部分分工明确,团队合作时易于统一代码风格,可以快速接手别人的代码。
缺点
- 一个模块内的类数量增大,代码量增大,在层与层之间需要花更多时间设计接口。
- 模块的初始化较为复杂,打开一个新的界面需要生成View、Presenter、Interactor,并且设置互相之间的依赖关系。而iOS中缺少这种设置复杂初始化的原生方式。